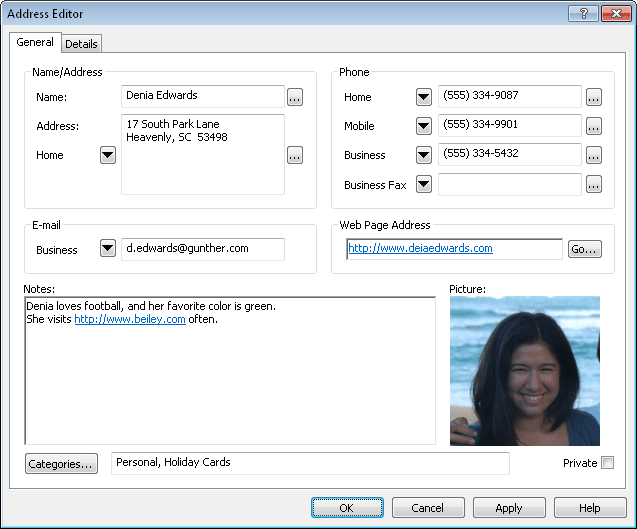
The address editor has 2 pages: General and Details. A view of the General page is shown below:

An address can have 3 mailing addresses, 3 e-mail addresses, and 12 phone
numbers. Only 1 mailing address is displayed at any one time. Only 1
e-mail address is displayed at any one time. 4 phone numbers are displayed
at any one time. To change the displayed Address, E-mail, or Phone number,
click the small down arrow ![]() to the left of the control.
As a shortcut, you can press
Ctrl+S while the keyboard focus is in any of
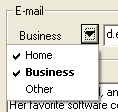
these fields. A small menu will
appear, as shown here:
to the left of the control.
As a shortcut, you can press
Ctrl+S while the keyboard focus is in any of
these fields. A small menu will
appear, as shown here:

This menu has a check mark next to each field that has an entry recorded. In this example, there is a Home and Business e-mail address recorded, but no Other e-mail. The Business e-mail is currently selected, thus it is bold in the menu. Select any item from this menu to change the currently displayed E-mail. The mailing address and phone down arrows work in a similar manner.
The mailing address that is selected for display is the default mailing address. The e-mail that is selected for display is the default e-mail. Since there are 4 displayed phone numbers, the selected phone numbers are the primary phone, secondary phone, third phone, and fourth phone.
The Name, Address, and Phone fields are composed of smaller, more detailed, components. The following table shows the fields, and their components:
| Primary Field | Components |
| Name | First Middle Last |
| Address | Street City State/Province ZIP/Postal Code Country/Region |
| Phone |
Country/Region City/Area Code Local Number |
When entering any of these fields (Name, Address, or a Phone number) you can enter the values into the fields. Handy will parse the field into the most logical components. For example, if you enter the following name:
Dena Edwards
Handy would assign "Dena" to the First name, and "Edwards" to
the Last name. The Middle name would be empty. You can also view/modify the components directly.
Select the small button with the ellipsis ![]() located to the right of the field. As a shortcut, you can press
Ctrl+D
while the keyboard focus is in any of these fields. Either method will
bring up the associated field components, where you can make any desired
adjustments.
located to the right of the field. As a shortcut, you can press
Ctrl+D
while the keyboard focus is in any of these fields. Either method will
bring up the associated field components, where you can make any desired
adjustments.
|
Name |
The full name of the address. Enter the name as you
would like it displayed in the Details Window.
Press the |
|
Address |
This is the mailing address. Up to 3 mailing addresses can be
recorded (Home, Business, Other). Use the down arrow
|
|
|
This is the e-mail address. Up to 3 e-mail addresses can be
recorded (Home, Business, Other). Use the down arrow
|
|
Phone |
These are the phone numbers. Up to 12 phone numbers can be
recorded. Use the down arrow |
|
Web Page Address |
Enter a URL, such as http://www.mydomain.com. You can open up a browser, and go to this URL by double clicking the text, or pressing the Go... button. |
|
Notes |
Enter any other information you'd like to record with this address. When the notes include a URL you can open this address by double clicking on the text. There is no limit to the length of the note that you can record. URLs in this note field can begin with http:// or https:// or file://. You can use the file:// URL to reference a local file on your hard drive. For example: file://C:\Temp\MySpreadSheet.xlsx will link to that file on your hard drive, so you can quickly open it by double clicking on it in the notes section of your contact. |
|
Picture |
Assign an optional image to display for this address by clicking in this picture box. The picture size and location displayed in the Details Window can be customized in the Details Display dialog. |
|
Categories |
Enter the names of the categories this address belongs in. When entering multiple categories, separate the category names with commas. You can also press the Categories... button to select the categories from a list. |
|
Private |
Select this option to mark this address as private. The display of private addresses can be toggled on/off with the View/Private menu command. To password protect private addresses use the menu command File/Options... to open the Password Options dialog. |